I found a link that I thought I would share with anyone who enjoyed my post about fixing my belt. If you didn't enjoy my post I'll still share it with you. A guy over at Primer shared a post about how to easily and cheaply make your own high quality belt as well as some pointers on how to know if the belt you're looking at buying is top quality or not.
In other news I had a great weekend with my little family. We went to more junk shops (starting to see a trend here). We've started to look around for things that catch our eye for Christmas presents. We have a lot of family so an early start is needed. We didn't find anything that screamed any one's name in particular, but we've got time. I had been craving a really good cheeseburger since Friday and that craving was met at the Silver Diner when we went to dinner with my family. They have delicious burgers and I got a nice juicy one with Pepper Jack cheese and onion rings. So yummy.
On Sunday we went to church which was something we hadn't done in a while. The boy enjoyed running around with all of the other little boys. We should probably take him out more...
Last night I decided that we needed baked apples! I have no idea why. So I cored some apples while my wife mixed up some brown sugar, cinnamon, chopped almonds, and craisins. We filled the apples and baked them in a pan. We didn't have any ice cream to go with them so we threw some vanilla almond milk into the ice cream maker to see what would happen. It tasted pretty good but it melted really quickly. Overall it was a very satisfying dessert. We also got The Hunger Games and watched that. I actually really enjoyed it.
Happy first day of the week!
Monday, August 20, 2012

Friday, August 17, 2012
Sword of Altair (WIP Part 1)
So, I mentioned in my last post that I love the game Assassin's Creed. For anyone out there who isn't into gaming I'll give a quick breakdown of the game. Desmond is a man in modern day (or maybe slightly futuristic?) America who is, unbeknownst to him, a descendant of a line of assassins dating back to B.C. These assassins existed to keep the Templar Knights (who are evil in this storyline) in check. The Templar's have a grand scheme to take over to world using some mystical artifacts and Indiana Jones was busy so it's up to our hero Desmond to stop them. In order to stop them he has to figure out their plan and he does this by reliving the lives of his ancestors through a machine. It's sort of halfway between time travel and virtual reality. Yes, it's kind of like the Matrix. So, even though the game series is based in modern times the majority of it is actually played out in ancient Israel, Italy, and various other locales.
I like the gameplay. I really like the storyline and the intrigue. I love the design. I want to walk around in the outfits worn by the main characters. I want to make all of the vambraces and spaulders and boots tunics and weapons and, and, and...
Before I post anything I'll go ahead and say that any artwork is owned by Ubisoft games. I'm not taking any credit for it. It's all amazing artwork and design and far over anything I would ever be able to do.
There are a lot of other cool characters in these games, but these are the main assassins. Right now I have my sights set on some of the stuff from the first game. I grabbed some pictures of the sword off the internet and printed them out so I'd have a template. I pinned them down so they wouldn't shift while I traced around them.

I decided to make the sword in three parts. Handle, Cross Guard, and Blade. I think it would have been easier to do one piece that started as the handle and turned into the blade and then attach the cross guard to it, but I already started and rather than lose momentum dwelling on how I could have done it I'm just going to keep on pressing on.

After I traced them onto the wood I decided they were a bit too small so I made them both a little longer and then cut them out with my saw.

What I'm going to try to do is drill out the center of the cross guard. Then that tab on the handle will fit inside.

All the pieces are rough cut now, and I've started to rasp the handle into shape.

Here's what it will look like together. Once I get everything the correct shape and size I'll start adding details. I think I'm going to sink a metal rod into the handle which will go through the cross guard and into the blade for support.
Here's a replica being offered by museum replicas so you can get a better idea of what it will look like when I'm done.

I'm really excited to see this project finished, and should it turn out like I want I think I will be more proud of this than any of the projects I've done before. *crosses fingers* Let's hope it turns out like I want.
I like the gameplay. I really like the storyline and the intrigue. I love the design. I want to walk around in the outfits worn by the main characters. I want to make all of the vambraces and spaulders and boots tunics and weapons and, and, and...
Before I post anything I'll go ahead and say that any artwork is owned by Ubisoft games. I'm not taking any credit for it. It's all amazing artwork and design and far over anything I would ever be able to do.
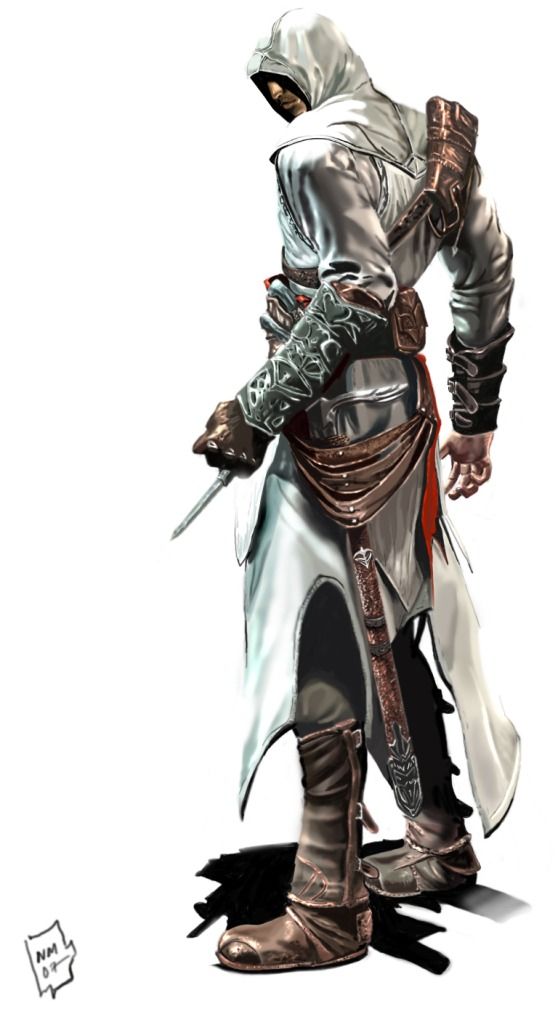 |
| This is Altair from the first game. |
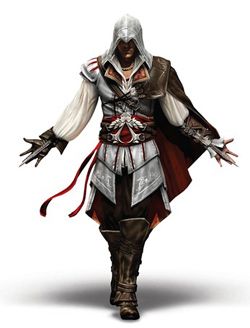 |
| Ezio from the second game. |
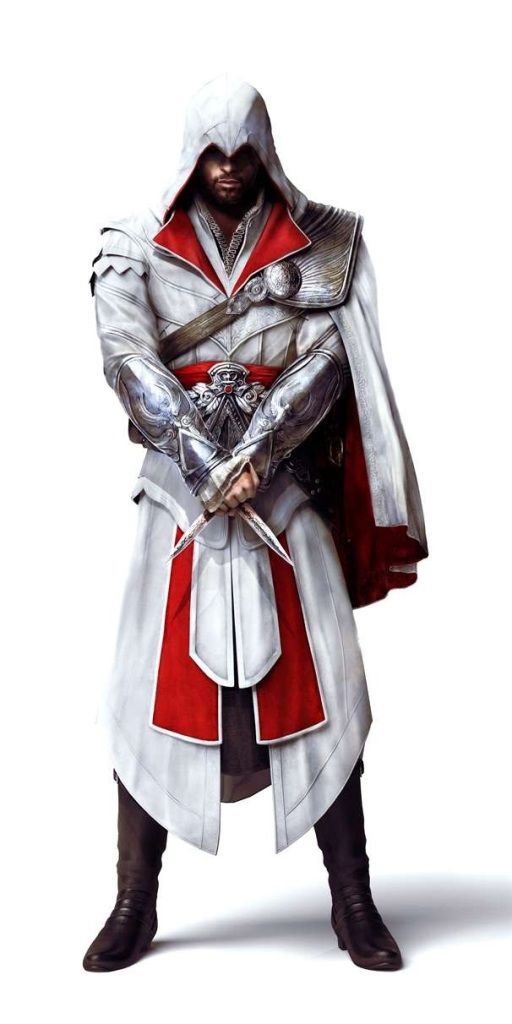 |
| Third Game. |
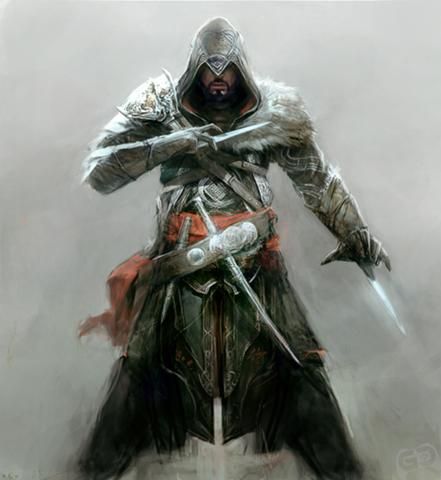 |
| Fourth Game. |
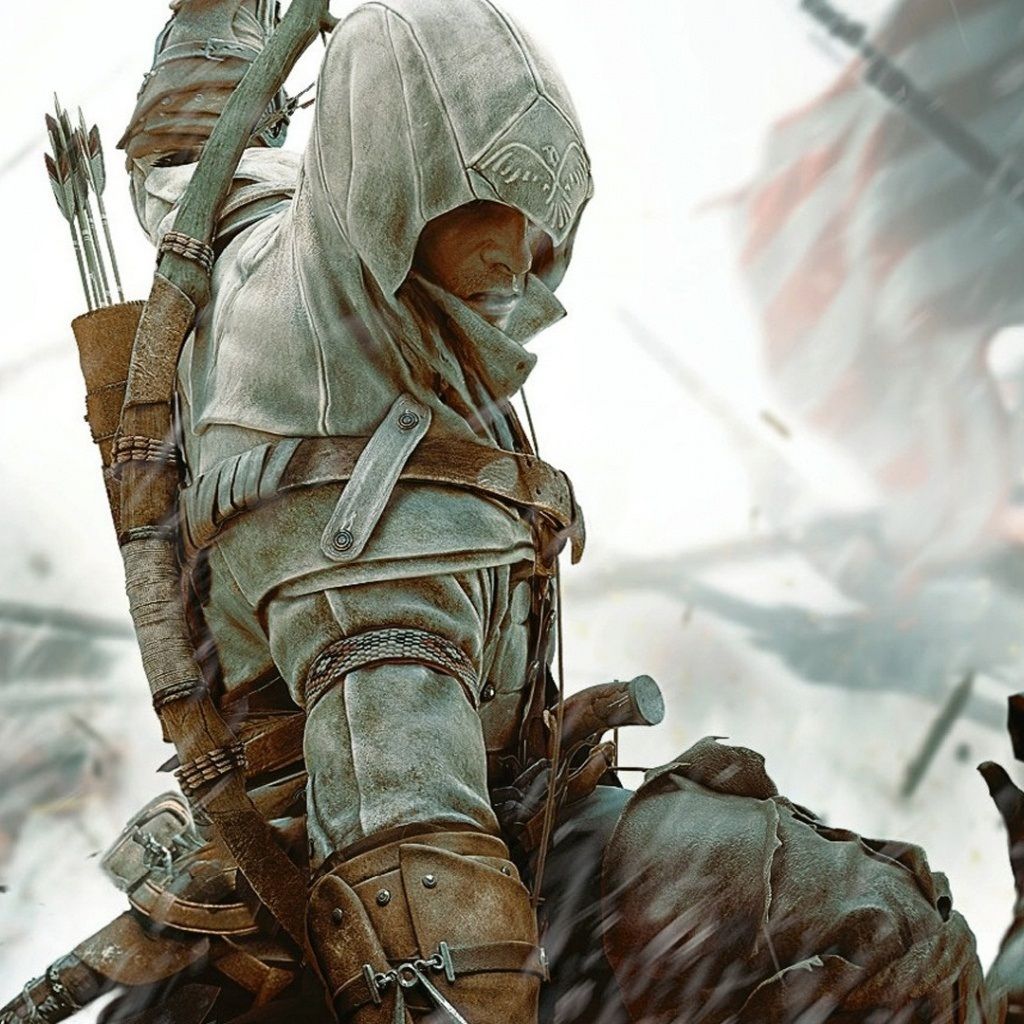 |
| Latest Game. |
There are a lot of other cool characters in these games, but these are the main assassins. Right now I have my sights set on some of the stuff from the first game. I grabbed some pictures of the sword off the internet and printed them out so I'd have a template. I pinned them down so they wouldn't shift while I traced around them.

I decided to make the sword in three parts. Handle, Cross Guard, and Blade. I think it would have been easier to do one piece that started as the handle and turned into the blade and then attach the cross guard to it, but I already started and rather than lose momentum dwelling on how I could have done it I'm just going to keep on pressing on.
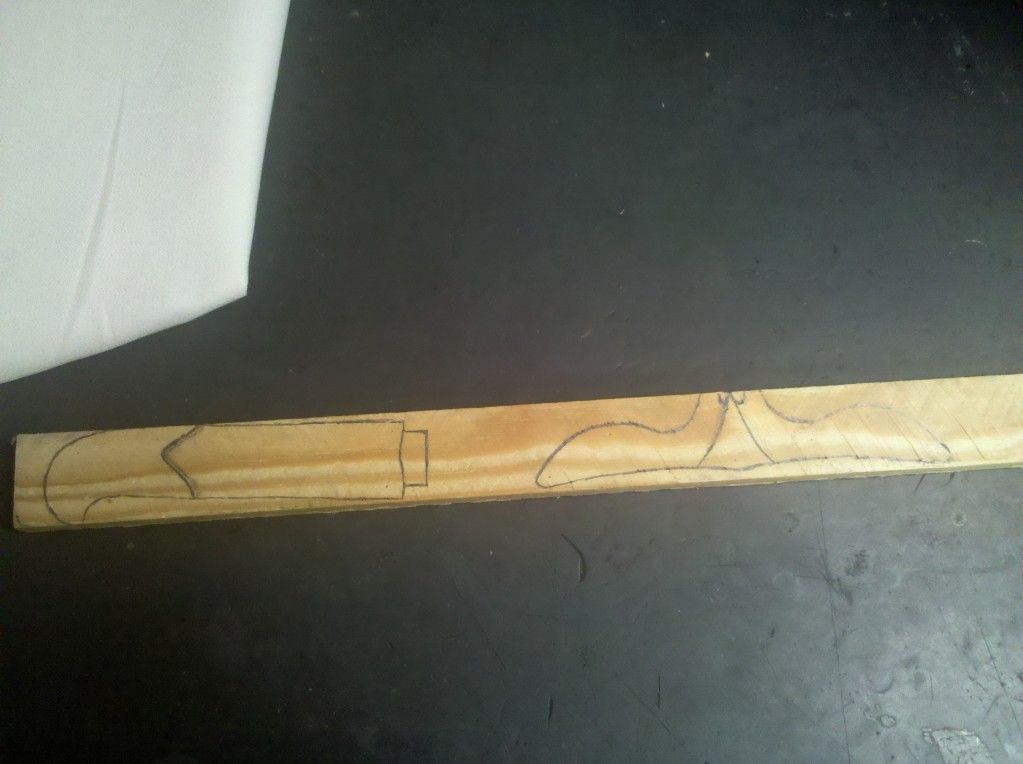
After I traced them onto the wood I decided they were a bit too small so I made them both a little longer and then cut them out with my saw.

What I'm going to try to do is drill out the center of the cross guard. Then that tab on the handle will fit inside.
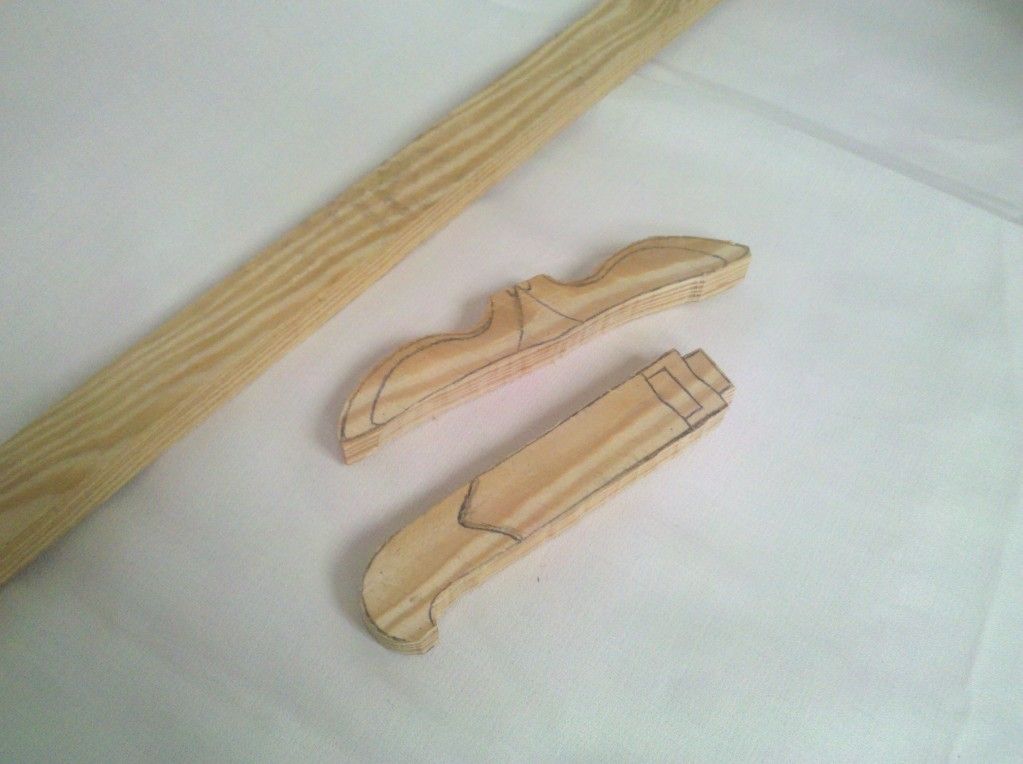
All the pieces are rough cut now, and I've started to rasp the handle into shape.
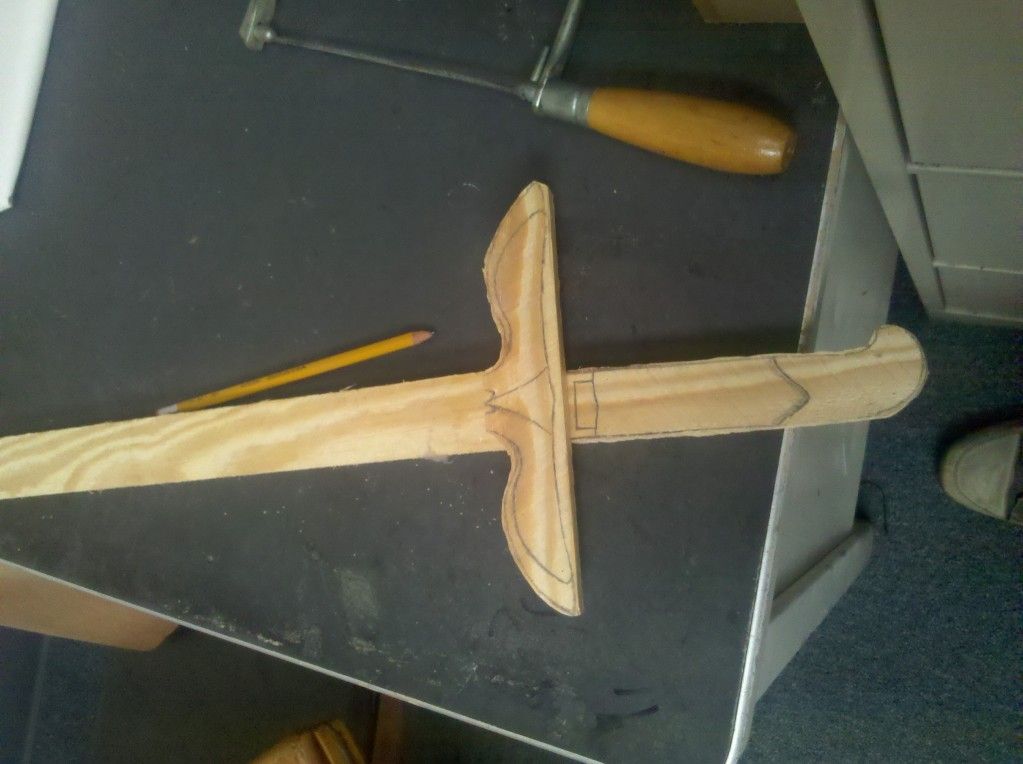
Here's what it will look like together. Once I get everything the correct shape and size I'll start adding details. I think I'm going to sink a metal rod into the handle which will go through the cross guard and into the blade for support.
Here's a replica being offered by museum replicas so you can get a better idea of what it will look like when I'm done.
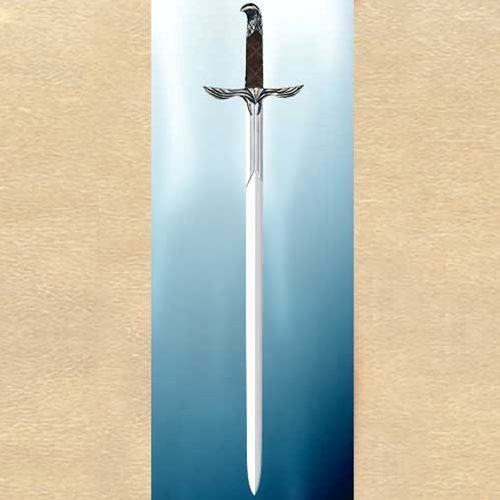
I'm really excited to see this project finished, and should it turn out like I want I think I will be more proud of this than any of the projects I've done before. *crosses fingers* Let's hope it turns out like I want.
Wednesday, August 15, 2012
New Old Finds
I skipped Monday's post. I don't know why I skipped it. I had a great weekend. I think I was just feeling lackadaisical that day.
We spent a lot of Saturday going to antique/consignment/junk shops. It was a lot of fun. There's this nice corridor of them on Lakeside. One of the ones we went into had a small collection of vintage shaving brushes for pretty cheap. Since I have a beard I don't actually do a lot of "shaving" per se. I've been reading about facial hair care though, and how modern men do it very wrong. It turns out that all of the various equipment men used back in the day was because it's actually good to treat your face nicely, not just because they hadn't figured out how to put eighteen blades on the same razor and create a can full of expanding foam for your face. Apparently the shaving brush helps condition your face for shaving. It helps loosen and soften your hairs so they don't fight against the razor as much. Either way, I picked up a brass handled shaving brush for $4 and was pretty happy with that. Now I just have to get some shaving soap, a safety razor, a pair of suspenders, a Model T Ford, some driving gloves, etc. Who says time travel is impossible?
We also found this awesome vintage metal pedal tractor that Meredith's dad insisted on buying for our son. Yes! It's seriously cool. I'll have to get some pictures but right now it's hidden waiting for her dad to get back into town. Since he bought it we wanted him to be part of the unveiling. I can't wait. Now I want to find one of the trailers for it.
I started on the leather vambrace that I was talking about last week. I got the design laid out with my swivel blade, but I started to stamp it and it just wasn't going well so I'm going to find some videos and figure out what I'm doing wrong. Once I figure it out I'll write about the whole process. In the meantime I started working on another wooden sword. This one's a little more complex than the last one. I have a fascination with the game Assassin's Creed. I love the game, but I also really love the artwork and the design so I'm going to try my hand at one of the swords. I won't have it finished by Friday, but I'll give a WIP update anyway.
Do you like antique shops or have a fascination for old tech that's resurfacing? Do you have any projects you're having trouble finishing?
We spent a lot of Saturday going to antique/consignment/junk shops. It was a lot of fun. There's this nice corridor of them on Lakeside. One of the ones we went into had a small collection of vintage shaving brushes for pretty cheap. Since I have a beard I don't actually do a lot of "shaving" per se. I've been reading about facial hair care though, and how modern men do it very wrong. It turns out that all of the various equipment men used back in the day was because it's actually good to treat your face nicely, not just because they hadn't figured out how to put eighteen blades on the same razor and create a can full of expanding foam for your face. Apparently the shaving brush helps condition your face for shaving. It helps loosen and soften your hairs so they don't fight against the razor as much. Either way, I picked up a brass handled shaving brush for $4 and was pretty happy with that. Now I just have to get some shaving soap, a safety razor, a pair of suspenders, a Model T Ford, some driving gloves, etc. Who says time travel is impossible?
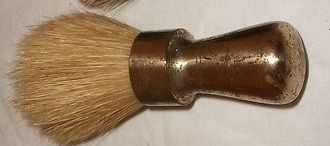 |
| This isn't mine but it looks just like it. |
We also found this awesome vintage metal pedal tractor that Meredith's dad insisted on buying for our son. Yes! It's seriously cool. I'll have to get some pictures but right now it's hidden waiting for her dad to get back into town. Since he bought it we wanted him to be part of the unveiling. I can't wait. Now I want to find one of the trailers for it.
I started on the leather vambrace that I was talking about last week. I got the design laid out with my swivel blade, but I started to stamp it and it just wasn't going well so I'm going to find some videos and figure out what I'm doing wrong. Once I figure it out I'll write about the whole process. In the meantime I started working on another wooden sword. This one's a little more complex than the last one. I have a fascination with the game Assassin's Creed. I love the game, but I also really love the artwork and the design so I'm going to try my hand at one of the swords. I won't have it finished by Friday, but I'll give a WIP update anyway.
Do you like antique shops or have a fascination for old tech that's resurfacing? Do you have any projects you're having trouble finishing?
Friday, August 10, 2012
Repairing a Treasure
I love thrift stores. Yeah, sometimes you feel like you're digging through a bunch of junk but other times? You find the most amazing things. My wife and I go through phases where we can't get enough of rummaging through thrift stores and then we don't want anything to do with them for a while.
Last year we did costumes for a production of Treasure Island and we practically lived in Goodwill. We kept going back every other day and checking different branches to see different stock. We got "pirate" scarves, pants and shirts to make ragged looking, coats that we made appropriately piratical, wide belts for hanging cutlasses, and even some decent boots.
Also, the pants I used to make my shorts were really nice, a great fit, under $5, and I got them at Goodwill.
Some of my favorite finds include: a pair of combat boots; a nice pair of paratrooper boots; this awesome coat that looks like it was from a park ranger, it has a removable liner and a removable faux fur collar; and the nicest belt I have ever owned.
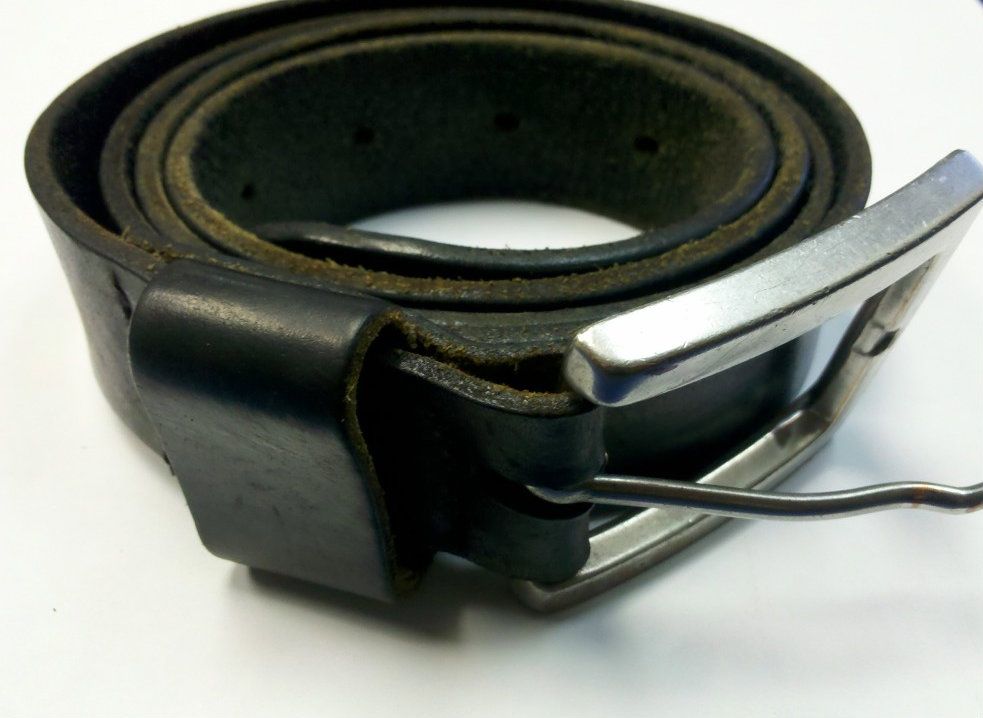
Seriously, this belt is high quality. I've bought a lot of belts and they all fall apart. Cheap belts are typically made by gluing cheap thin layers of leather together. Eventually the glue fails and the layers come apart. Then it's just a matter of time before each layer wears through. This belt isn't like that. It's made from a single piece of thick leather. I'll be honest and say that it doesn't look as nice as it could. It's not a nice shiny belt that you would want to pair with a suit, but this thing is tough.
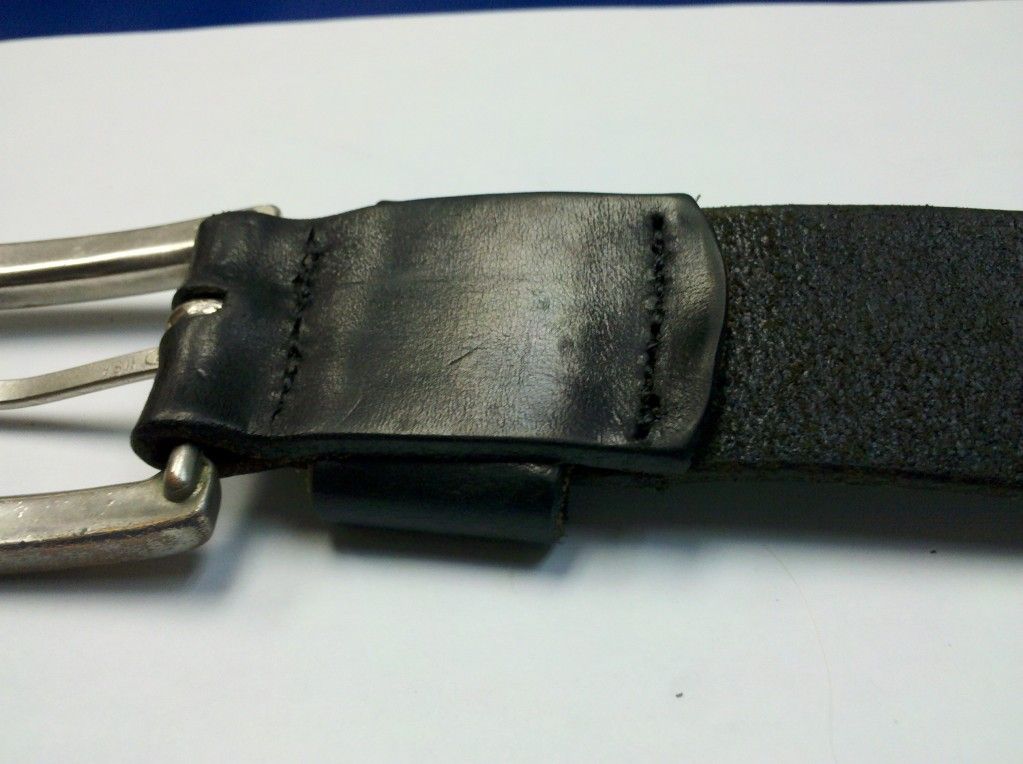
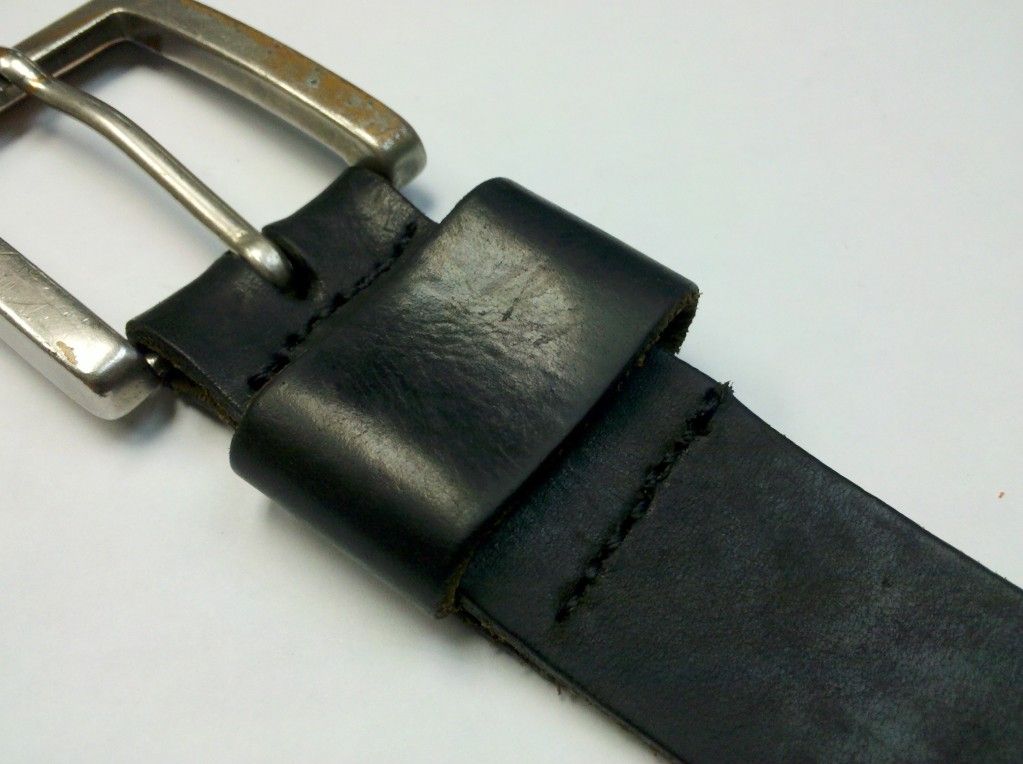
Recently it came apart. Not the leather, no. The stitching that holds the buckle in place. I guess they didn't make the stitching as tough as the rest of the belt. Obviously, I could have gone and gotten a new belt but I was not going to shell out the amount of money it would take to get as nice a belt as I already had and I wasn't going to be happy with a cheap one. So naturally I decided to fix it.
I already had the sewing awl that I used on both my leather journal and my wallet. I used it again to fix my belt but to be honest it wasn't necessary. The holes were already there since I was resewing it and even if they hadn't been I could have just punched holes with a regular awl or a leather punch and then used a needle and thread. I like using it though, and the thread it has is a tough waxed type.

The stitching had come completely out so I had to sew both seams. One to hold the buckle and the second to hold the little strap.

I started by threading the needle and pushing it through.

Then pull the excess thread the rest of the way through the hole and pull the needle back out so it looks like this.

Then push the needle through the next hole and pull it back out a little bit so it forms this little loop.

Run the end of the thread through the hole all the way, pull it taught and pull the needle back out. Repeat that process until you're finished. You have to keep it tight as you go along but make sure that the tension on either side is even or else it will pull to one side and look messy.

To tie it off I pulled the whole loose end of the thread through one layer and left it in between the layers. Then I pulled the awl back out and pushed into the adjacent hole, also only going through only one layer, pulled some extra thread through and cut it free. That gave me two ends that I could tie together with a square knot.

I repeated the whole process on the other side of the little strap and voila! Good as new! Or at least good as "gently loved".


So there you go. Whether you've happened upon a great thrift store treasure or you actually invested the money in a nice belt, you don't have to give up at the first sign of a little wear!
Last year we did costumes for a production of Treasure Island and we practically lived in Goodwill. We kept going back every other day and checking different branches to see different stock. We got "pirate" scarves, pants and shirts to make ragged looking, coats that we made appropriately piratical, wide belts for hanging cutlasses, and even some decent boots.
Also, the pants I used to make my shorts were really nice, a great fit, under $5, and I got them at Goodwill.
Some of my favorite finds include: a pair of combat boots; a nice pair of paratrooper boots; this awesome coat that looks like it was from a park ranger, it has a removable liner and a removable faux fur collar; and the nicest belt I have ever owned.
Seriously, this belt is high quality. I've bought a lot of belts and they all fall apart. Cheap belts are typically made by gluing cheap thin layers of leather together. Eventually the glue fails and the layers come apart. Then it's just a matter of time before each layer wears through. This belt isn't like that. It's made from a single piece of thick leather. I'll be honest and say that it doesn't look as nice as it could. It's not a nice shiny belt that you would want to pair with a suit, but this thing is tough.
Recently it came apart. Not the leather, no. The stitching that holds the buckle in place. I guess they didn't make the stitching as tough as the rest of the belt. Obviously, I could have gone and gotten a new belt but I was not going to shell out the amount of money it would take to get as nice a belt as I already had and I wasn't going to be happy with a cheap one. So naturally I decided to fix it.
I already had the sewing awl that I used on both my leather journal and my wallet. I used it again to fix my belt but to be honest it wasn't necessary. The holes were already there since I was resewing it and even if they hadn't been I could have just punched holes with a regular awl or a leather punch and then used a needle and thread. I like using it though, and the thread it has is a tough waxed type.
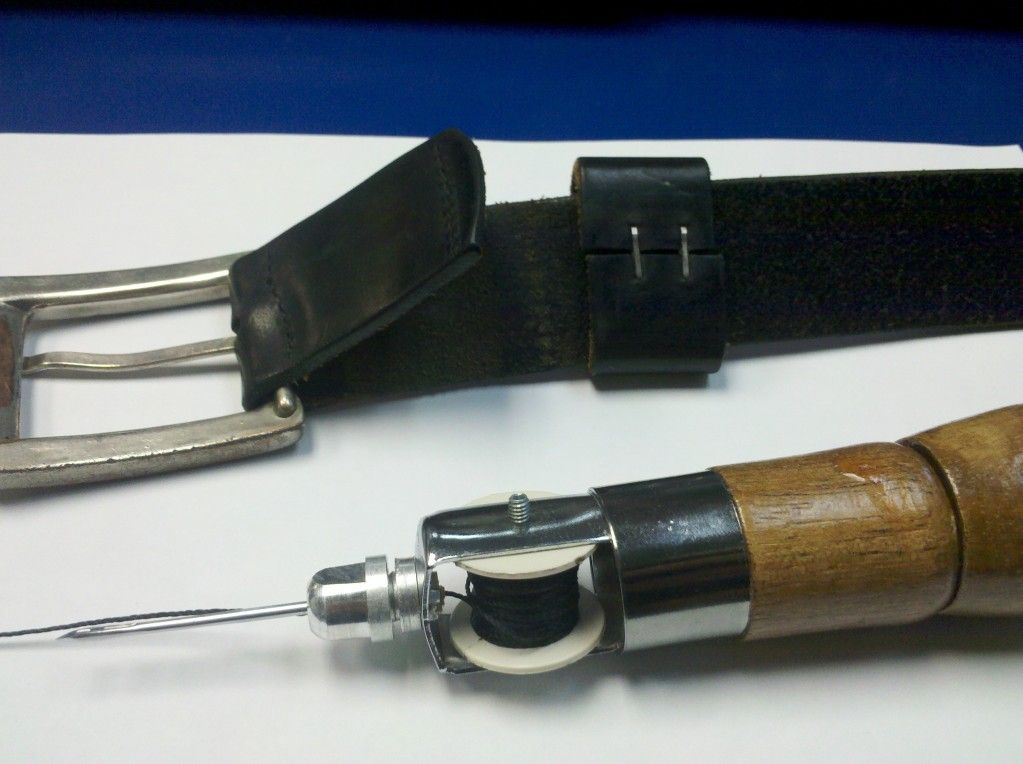
The stitching had come completely out so I had to sew both seams. One to hold the buckle and the second to hold the little strap.
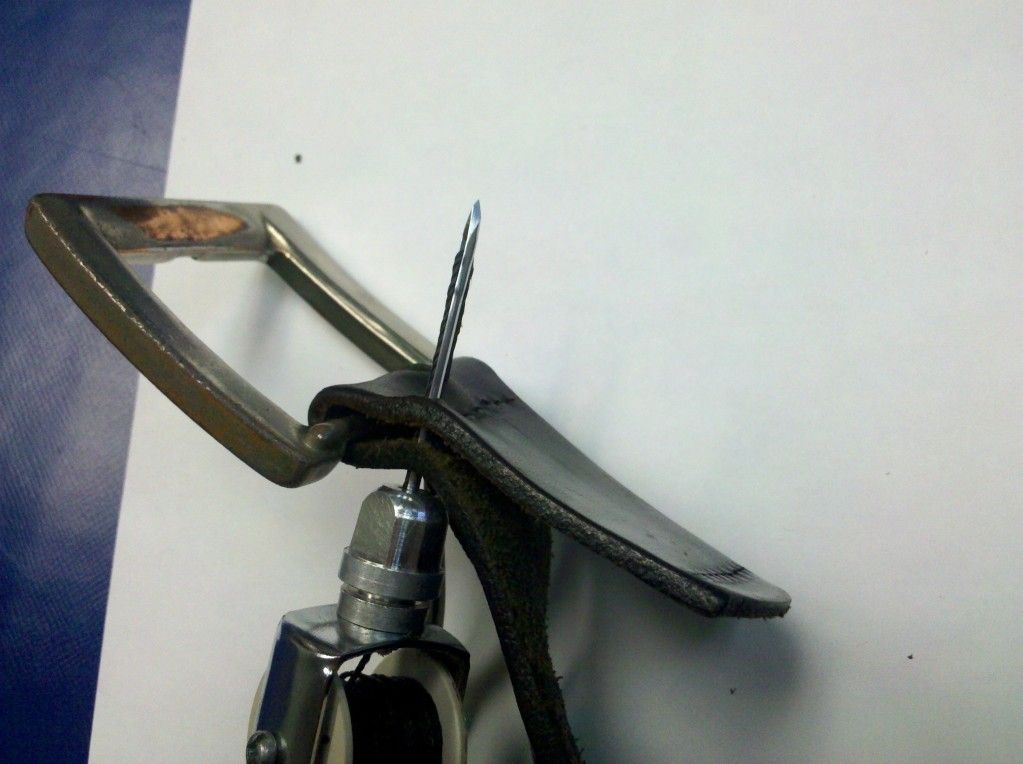
I started by threading the needle and pushing it through.
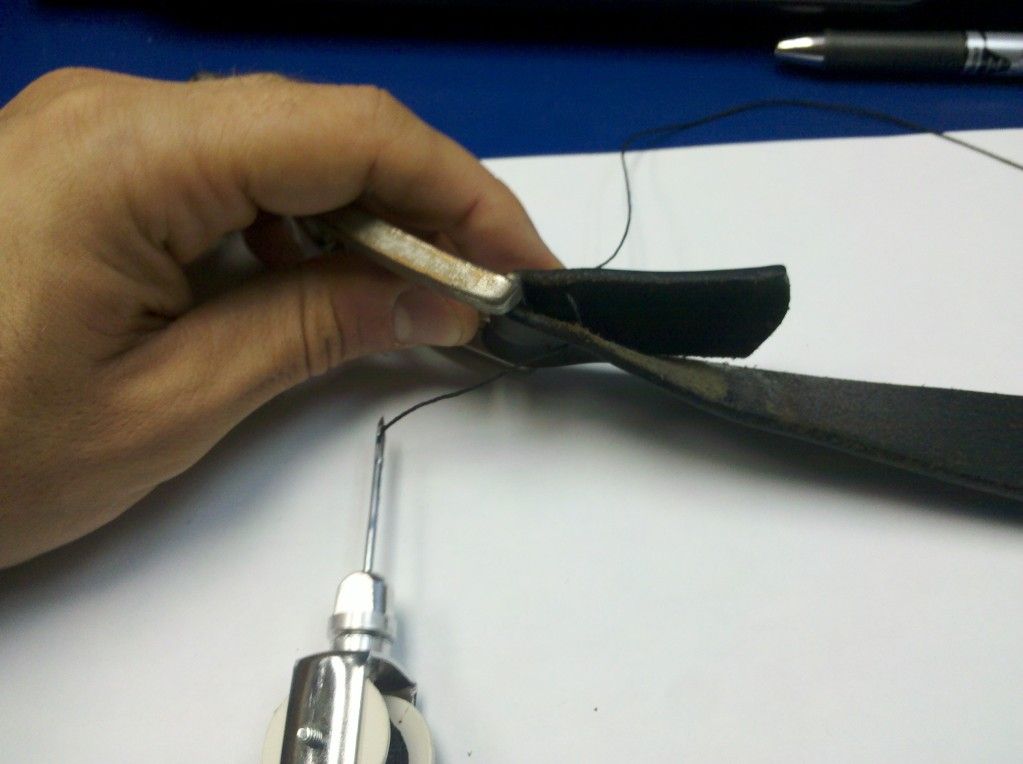
Then pull the excess thread the rest of the way through the hole and pull the needle back out so it looks like this.
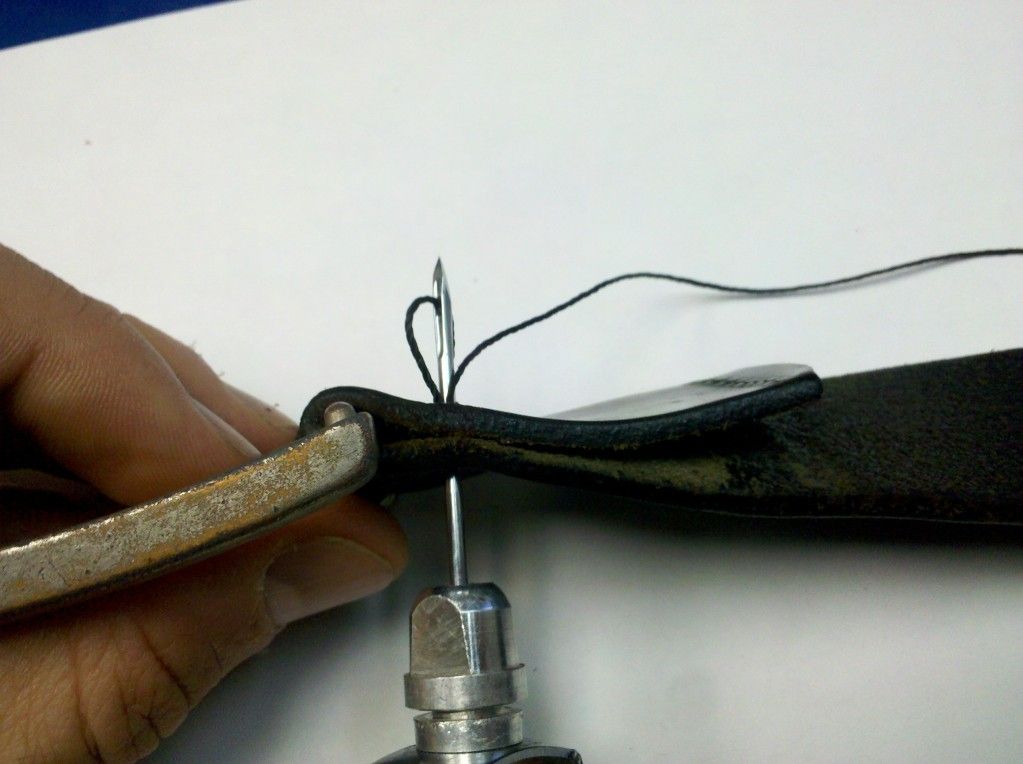
Then push the needle through the next hole and pull it back out a little bit so it forms this little loop.
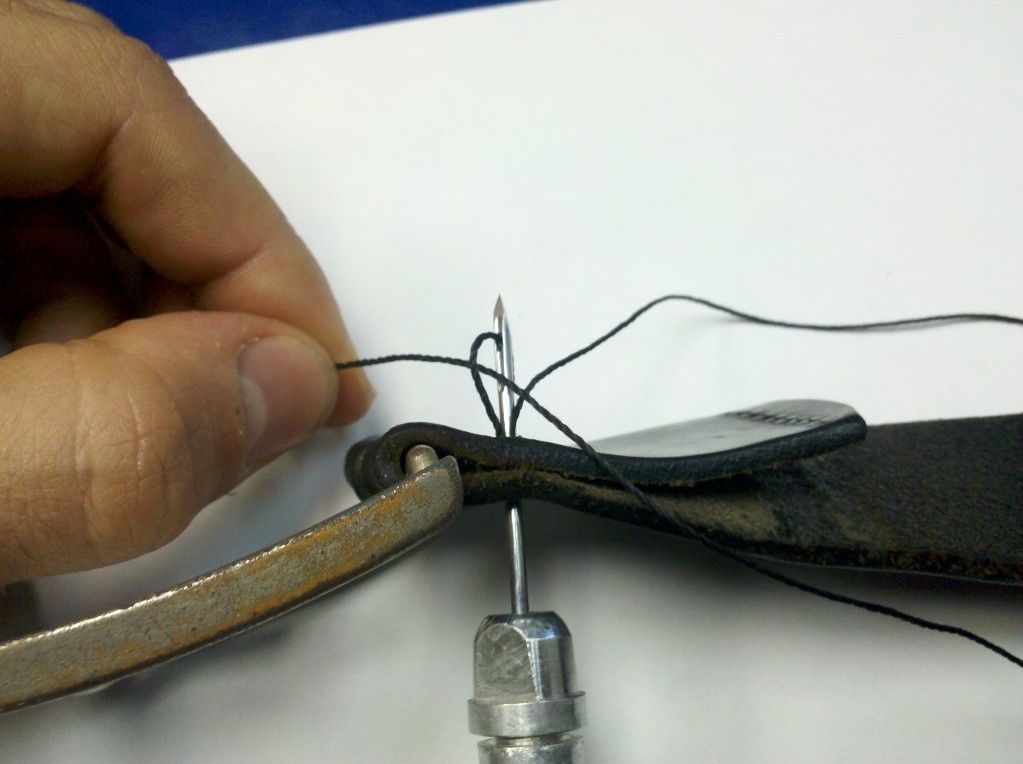
Run the end of the thread through the hole all the way, pull it taught and pull the needle back out. Repeat that process until you're finished. You have to keep it tight as you go along but make sure that the tension on either side is even or else it will pull to one side and look messy.
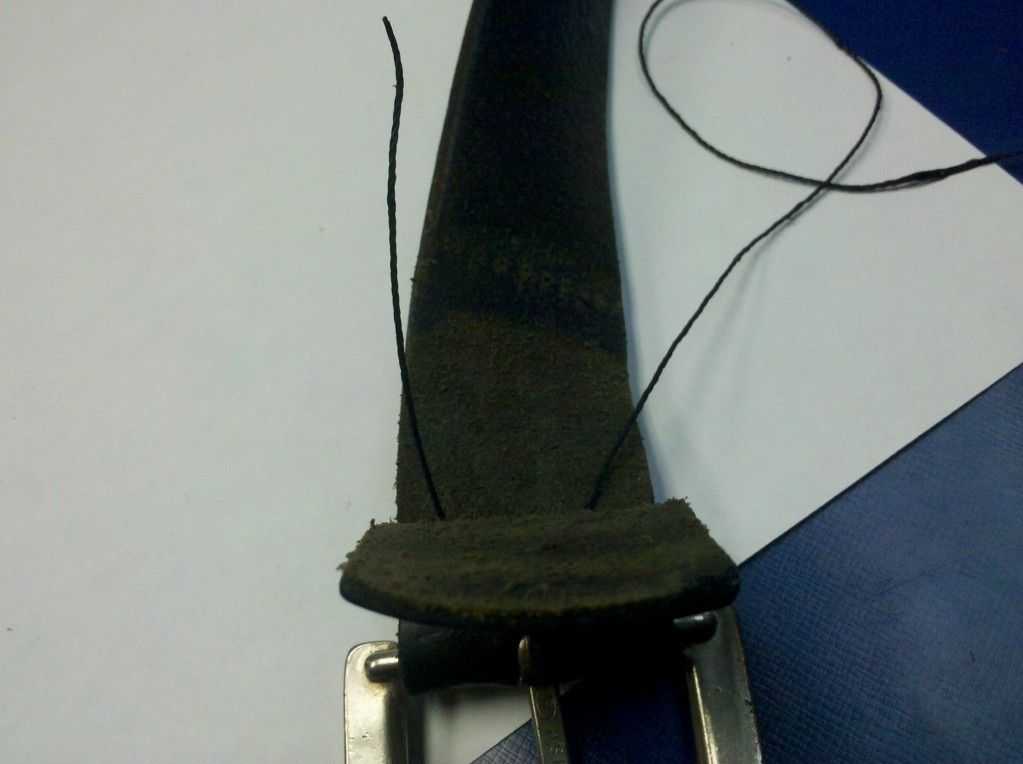
To tie it off I pulled the whole loose end of the thread through one layer and left it in between the layers. Then I pulled the awl back out and pushed into the adjacent hole, also only going through only one layer, pulled some extra thread through and cut it free. That gave me two ends that I could tie together with a square knot.
I repeated the whole process on the other side of the little strap and voila! Good as new! Or at least good as "gently loved".
So there you go. Whether you've happened upon a great thrift store treasure or you actually invested the money in a nice belt, you don't have to give up at the first sign of a little wear!
Wednesday, August 8, 2012
Thoughts on Loans (The Student Variety)
I've never reposted someone else's blog post before. I don't know if there's any sort of established rules of chivalry for sharing one so I hope I'm doing this right. I've been following Get Rich Slowly for a little while now after it was recommended to me by a friend. They cover such a vast array of financial situations and goals that sometimes I end up just scanning over stuff. I don't have student loans I'm dealing with, but I also don't have a wide range of stocks I'm trading either. Quite often though, they post something that I like a lot, often sharing with my wife the ideas they discuss.
The blog post for today focused on colleges and student debt, something that my wife and I have discussed at length previously, but I believe also briefly touches on something much greater. I believe the topic is important to examine so I thought I'd share it.
I have all kinds of controversial thoughts on this topic, so I'll just give you the link and let you read it for yourself. Enjoy.
Get Rich Slowly: Are Universities Immoral?
The blog post for today focused on colleges and student debt, something that my wife and I have discussed at length previously, but I believe also briefly touches on something much greater. I believe the topic is important to examine so I thought I'd share it.
I have all kinds of controversial thoughts on this topic, so I'll just give you the link and let you read it for yourself. Enjoy.
Get Rich Slowly: Are Universities Immoral?
Monday, August 6, 2012
Weekend! I Prefer the Weekend!
And so another week has begun. The weekend was good, but went by too quickly. We took a trip over to Hobby Lobby and picked up a large piece of board (I wish I could be more specific than that but that's what she always calls it. It's some sort of thick paper board used for drawing) for my wife's next project. She's going to do a themed project, but that's for her to talk about if and when she wants to. That night we went to a wonderfully low key pot-luck pool party. It was very relaxing.
On Sunday we went to Michael's, Target, and Best Buy. At Best Buy while my wife was following our son around she found a refrigerator with a tag that was printed incorrectly. It said it was free as advertised so we jokingly asked what we had to do to get that deal. I wish I had taken a picture. It was pretty funny and the sales people there were very confused.
I don't have any specific ideas for what my next project should be. Not for lack of ideas, but because of an excess. I'm tossing around a few things but I don't know if I'll have anything done in time for my Friday post. I decided that if I don't have anything in particular to do I might as well work on improving a useful skill. A while ago I had started working on a steampunk vambrace but ended up going in a different direction part of the way through. So I figure I'll practice some tooling on it and see what I come up with.

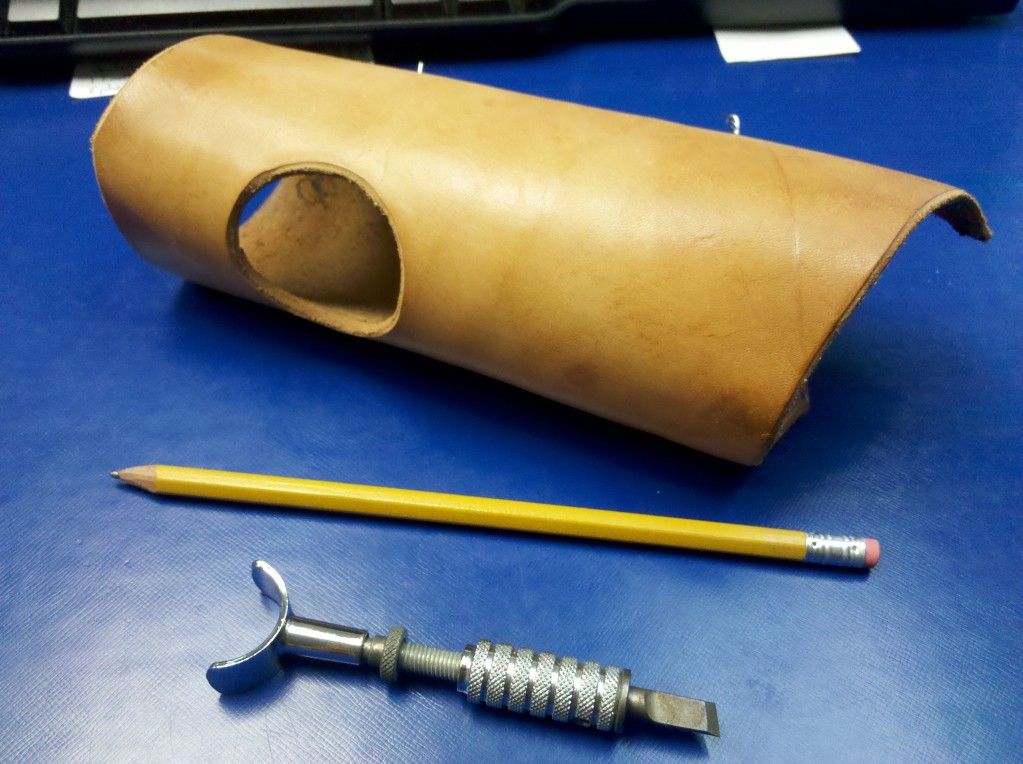
The hole was cut to fit a compass that was going to be the focal point of the design. I haven't come up with any other idea for a design so I might just stick with a steampunk idea, in which case I might actually use the compass. Or I might give it a multi-layered look and just cover it over. We'll see.

If I make anything usable out of this I'll put eyelets in the holes so it can be laced up more easily. The leather is uneven on purpose. I cut it out of a thinner part of leather and I decided to go with a more natural look and just follow the edges already there instead of cutting it straight.
We'll see what happens. There are a few things at home that I need for a couple upcoming projects. I'll try to bring them to work in the next day or so and then maybe I can get to work on some of the things that have been on my list for a while now.
On Sunday we went to Michael's, Target, and Best Buy. At Best Buy while my wife was following our son around she found a refrigerator with a tag that was printed incorrectly. It said it was free as advertised so we jokingly asked what we had to do to get that deal. I wish I had taken a picture. It was pretty funny and the sales people there were very confused.
I don't have any specific ideas for what my next project should be. Not for lack of ideas, but because of an excess. I'm tossing around a few things but I don't know if I'll have anything done in time for my Friday post. I decided that if I don't have anything in particular to do I might as well work on improving a useful skill. A while ago I had started working on a steampunk vambrace but ended up going in a different direction part of the way through. So I figure I'll practice some tooling on it and see what I come up with.
The hole was cut to fit a compass that was going to be the focal point of the design. I haven't come up with any other idea for a design so I might just stick with a steampunk idea, in which case I might actually use the compass. Or I might give it a multi-layered look and just cover it over. We'll see.
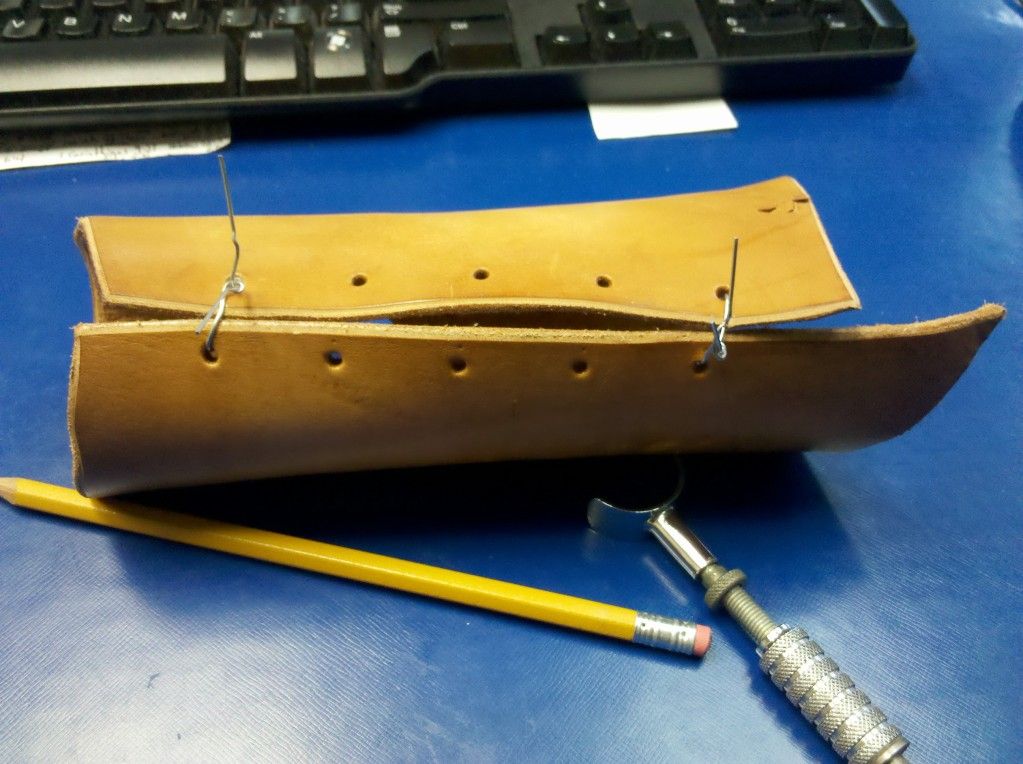
If I make anything usable out of this I'll put eyelets in the holes so it can be laced up more easily. The leather is uneven on purpose. I cut it out of a thinner part of leather and I decided to go with a more natural look and just follow the edges already there instead of cutting it straight.
We'll see what happens. There are a few things at home that I need for a couple upcoming projects. I'll try to bring them to work in the next day or so and then maybe I can get to work on some of the things that have been on my list for a while now.
Friday, August 3, 2012
Wooden Swordmaking
This past May my wife and son and I went down to the Georgia Renaissance Festival, and while there I picked up a little wooden sword for my son (at 16 months en garde is already a part of his small vocabulary and he knows how to sword fight). It came from The Black Swan Armoury and was very cool but very simple. I spent some time looking around at their selection, they have lots of different sizes and types of weapons, and decided that I could make some myself.
This past week I finally decided to try my hand at my own toy sword. While I was looking up wooden swords online (gotta do my research) I found this blog post. The sword designs he came up with are really cool and inspiring. I decided to go a little more simple than those but if I do many more of these I might have to try using some cool wood like he used. And I definitely want to make some leather scabbards like he's made.
I spent some time designing what I wanted the sword to look like and this is what I came up with:

It's a fairly basic design and I figured that it gave me a place to add a hand guard but didn't require it if I didn't feel up to it.
I got some pieces of wood from work. They're from a pallet that was being thrown away so I have no idea what kind of wood they are. I traced the shape onto it and started to cut it out with my coping saw.


Now I have to admit to not being very good with a coping saw. The angle of the blade is adjustable and somehow it kept getting turned in directions I didn't want it to. This resulted in me taking a chunk out of one side of the blade.

I could have kept the same shape but it would have required me to shave both sides down and end up with a much smalled dagger, so instead I decided to go with the flow and see how it evolved. I used my rasp to round the edges and just generally refine the shape.

After I had the shape defined fairly well I took a round file and began to make a separation between the handle and the blade.

After I had a good defining line between the blade and the handle I went back to the rasp to quickly thin the blade out. It's not that much thinner than the handle, but I wanted some amount of difference. I also used files when I got closer to the thickness I wanted to smooth it back out and to give it a bevelled edge. I also used files to smooth all of the edges and a half round file to round the handle.


Once I felt comfortable that I had it shaped just the way I wanted (or the way my coping saw apparently wanted) I sanded it all down. I'd like to say that I took my time to do it right and started with a coarse sandpaper and then gradually moved to a fine grit, but in reality I just grabbed some scrap sandpaper and scrubbed vigorously until I had turned my scraps of sandpaper into shreds of sandpaper. At that point it was pretty smooth so I was happy.
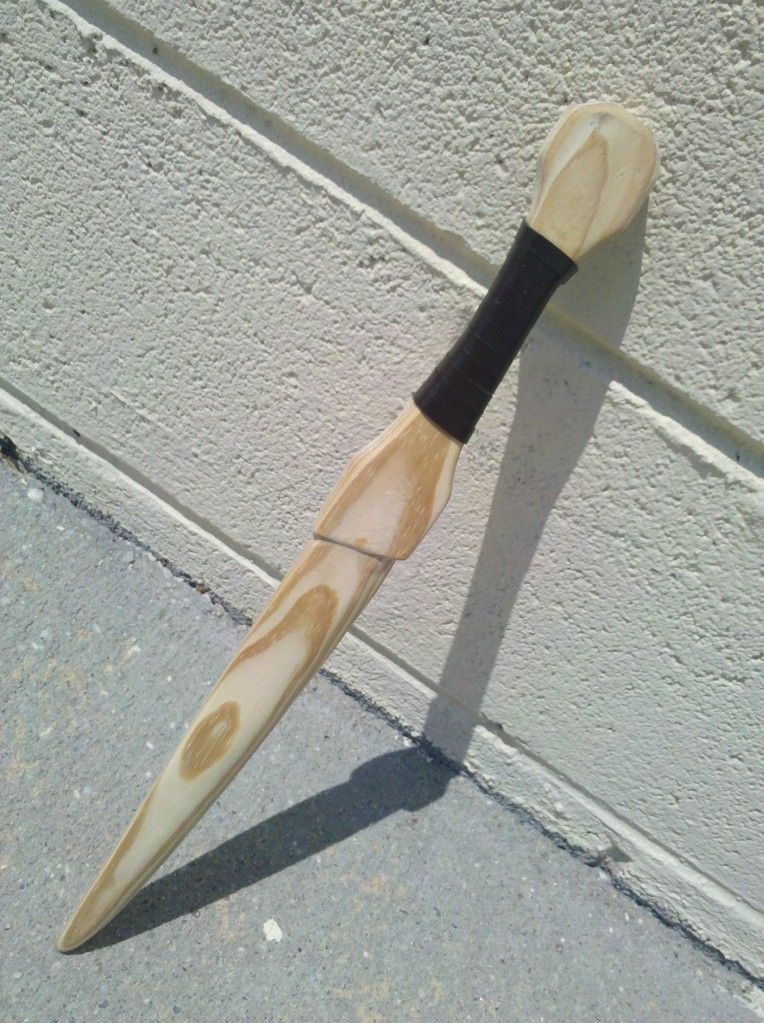
I wanted to do something to it to finish it off and make it look really cool so I stared at it for a while and tried to imagine it with different accessories. I considered doing a cool design with my wood burner but I just couldn't figure out what to do so instead I ended up just going with a leather wrapped handle. I had a long strip of some sort of fake leather that I ended up using because it was already the perfect size.
At some point during all of my projects I end up cheating or using something in a way that it was not intended to be used. This is that moment. I didn't have any glue and I just wanted to finish it so I ended up using this ModPodge Puzzle Saver stuff that I have. It's basically glue so hopefully it will be fine, but it's not intended for this kind of use so it might come apart later and force me to find the appropriate type of glue. Either way I spread some of it around on the handle and the back of the strap as I wrapped it around.

Once I had wrapped the strap around the handle I tucked the end under and coated it with more of the "glue".

Here are a couple shots of the final project.


This past week I finally decided to try my hand at my own toy sword. While I was looking up wooden swords online (gotta do my research) I found this blog post. The sword designs he came up with are really cool and inspiring. I decided to go a little more simple than those but if I do many more of these I might have to try using some cool wood like he used. And I definitely want to make some leather scabbards like he's made.
I spent some time designing what I wanted the sword to look like and this is what I came up with:
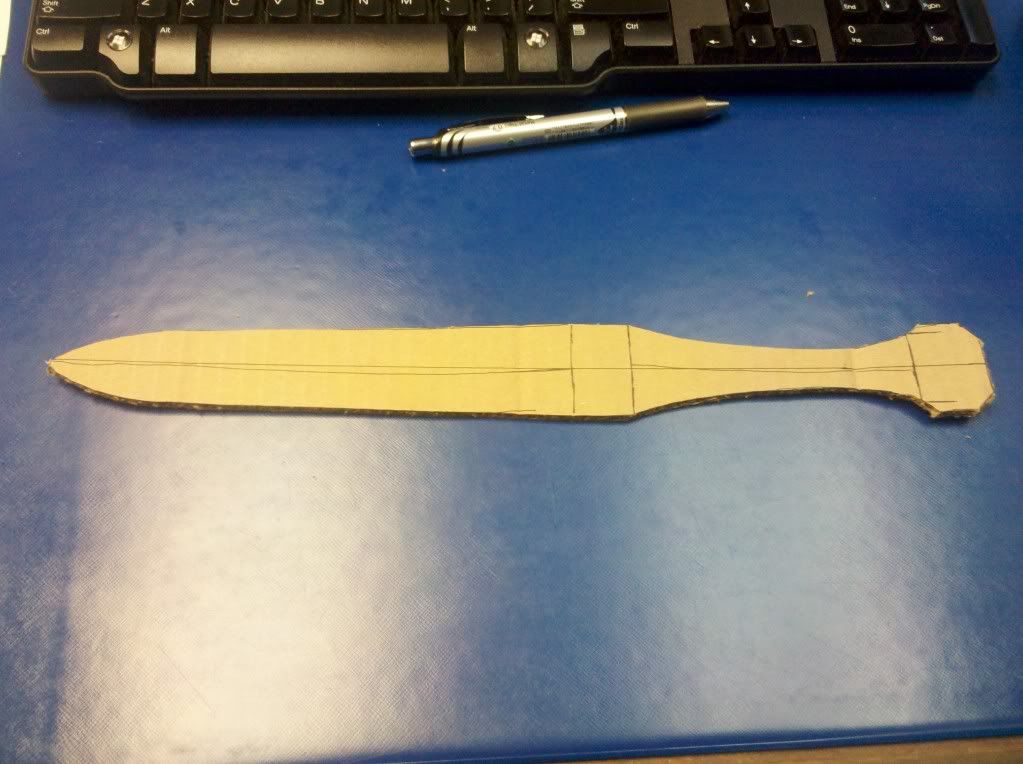
It's a fairly basic design and I figured that it gave me a place to add a hand guard but didn't require it if I didn't feel up to it.
I got some pieces of wood from work. They're from a pallet that was being thrown away so I have no idea what kind of wood they are. I traced the shape onto it and started to cut it out with my coping saw.
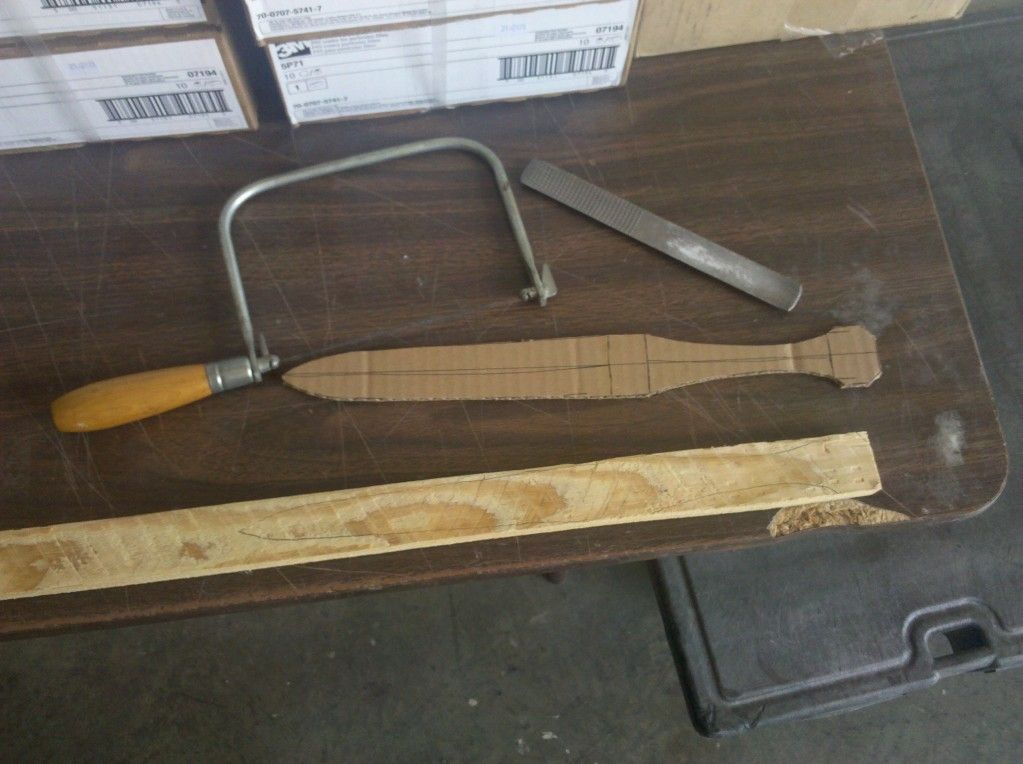
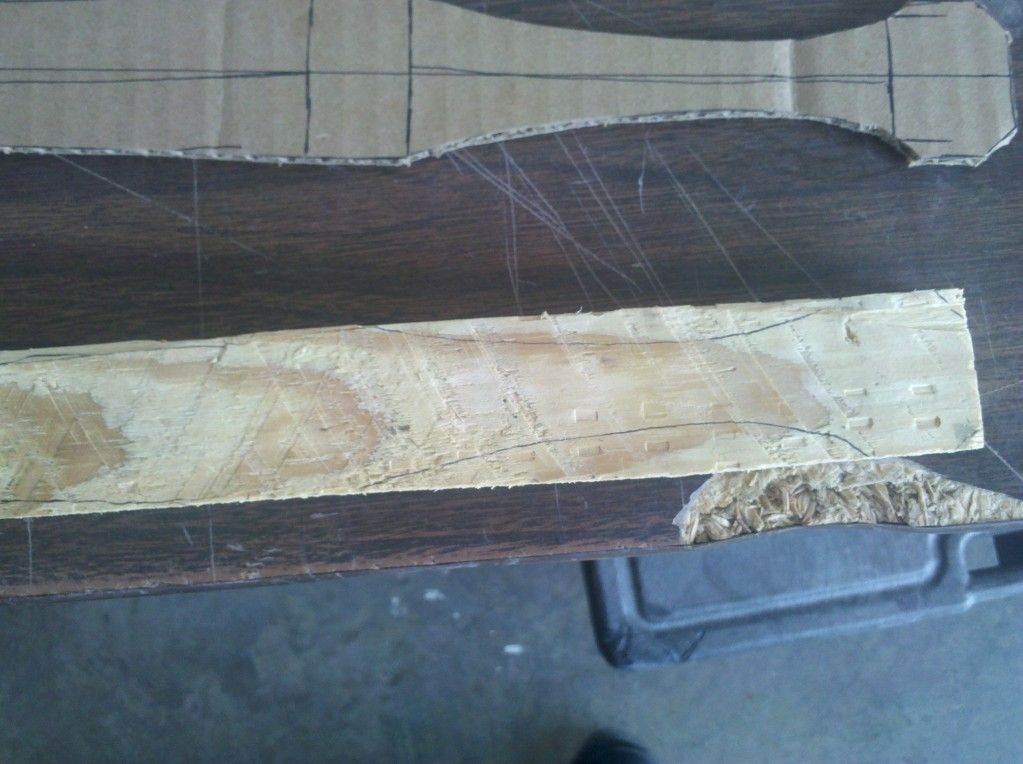
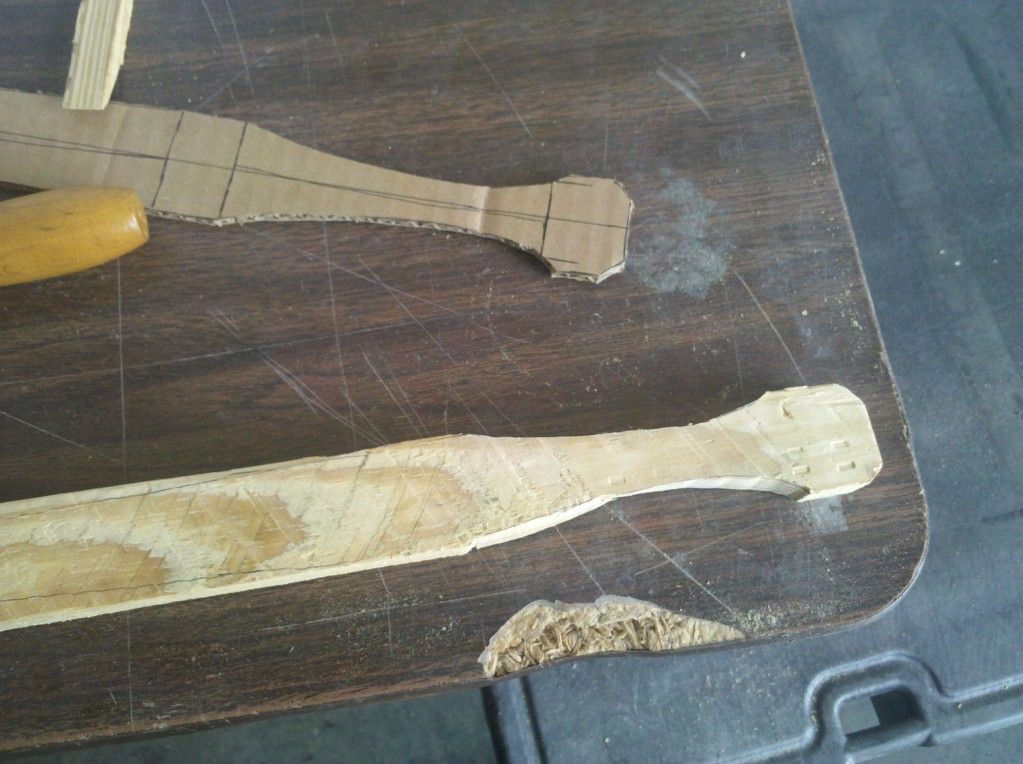
Now I have to admit to not being very good with a coping saw. The angle of the blade is adjustable and somehow it kept getting turned in directions I didn't want it to. This resulted in me taking a chunk out of one side of the blade.
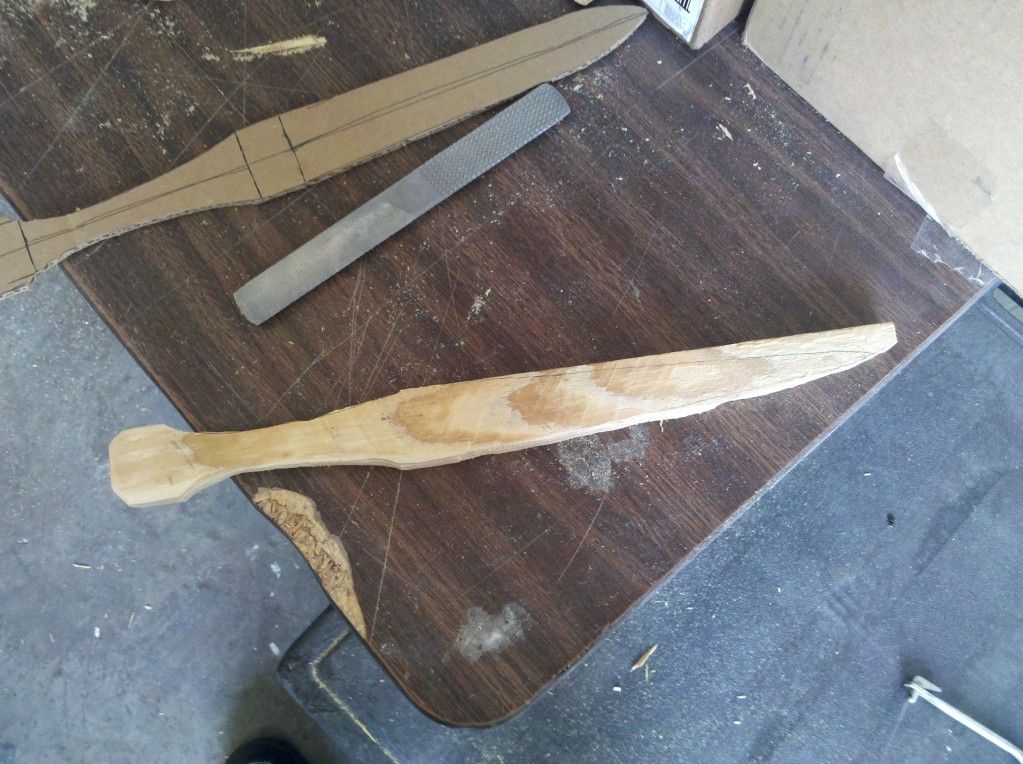
I could have kept the same shape but it would have required me to shave both sides down and end up with a much smalled dagger, so instead I decided to go with the flow and see how it evolved. I used my rasp to round the edges and just generally refine the shape.
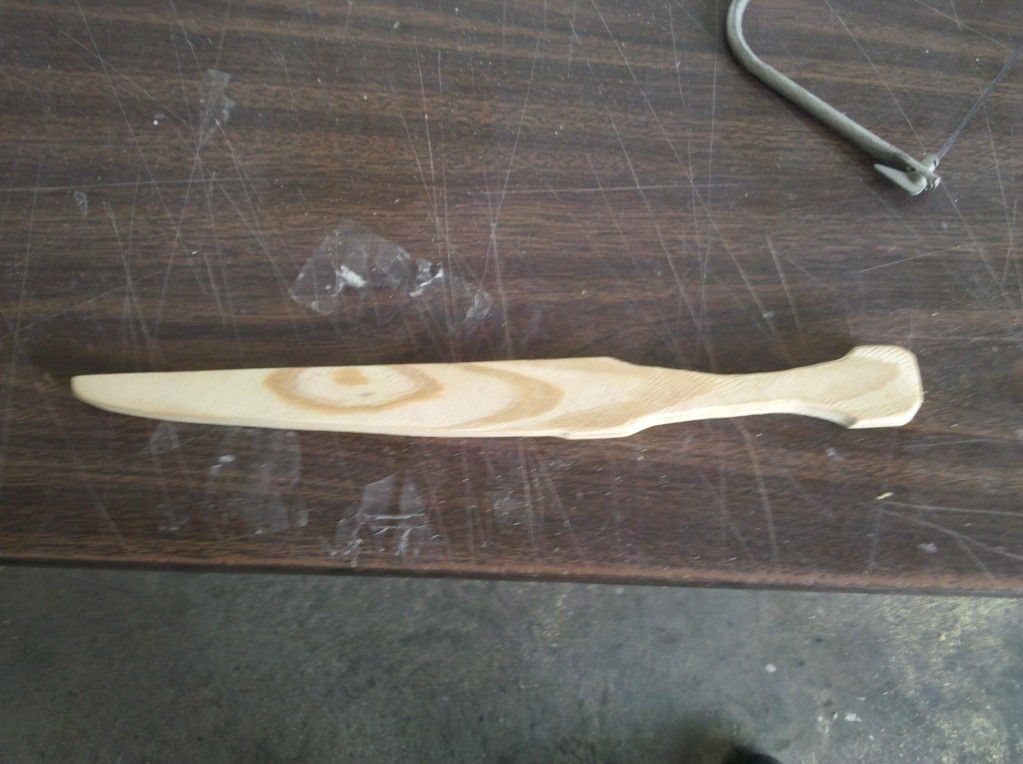
After I had the shape defined fairly well I took a round file and began to make a separation between the handle and the blade.
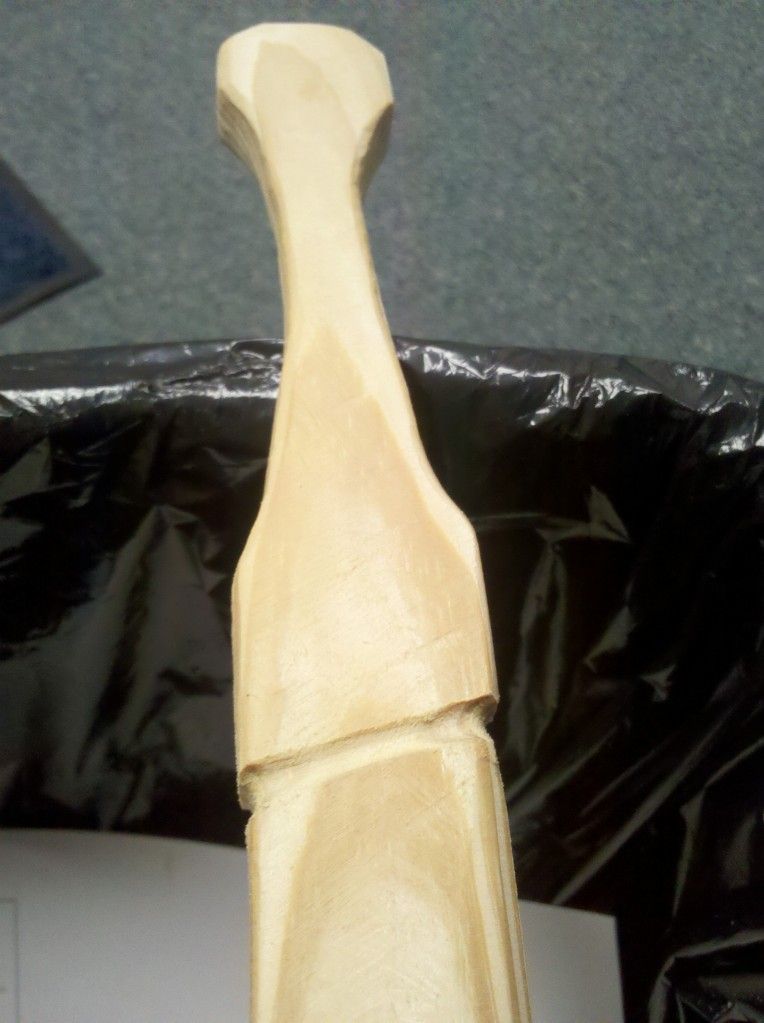
After I had a good defining line between the blade and the handle I went back to the rasp to quickly thin the blade out. It's not that much thinner than the handle, but I wanted some amount of difference. I also used files when I got closer to the thickness I wanted to smooth it back out and to give it a bevelled edge. I also used files to smooth all of the edges and a half round file to round the handle.

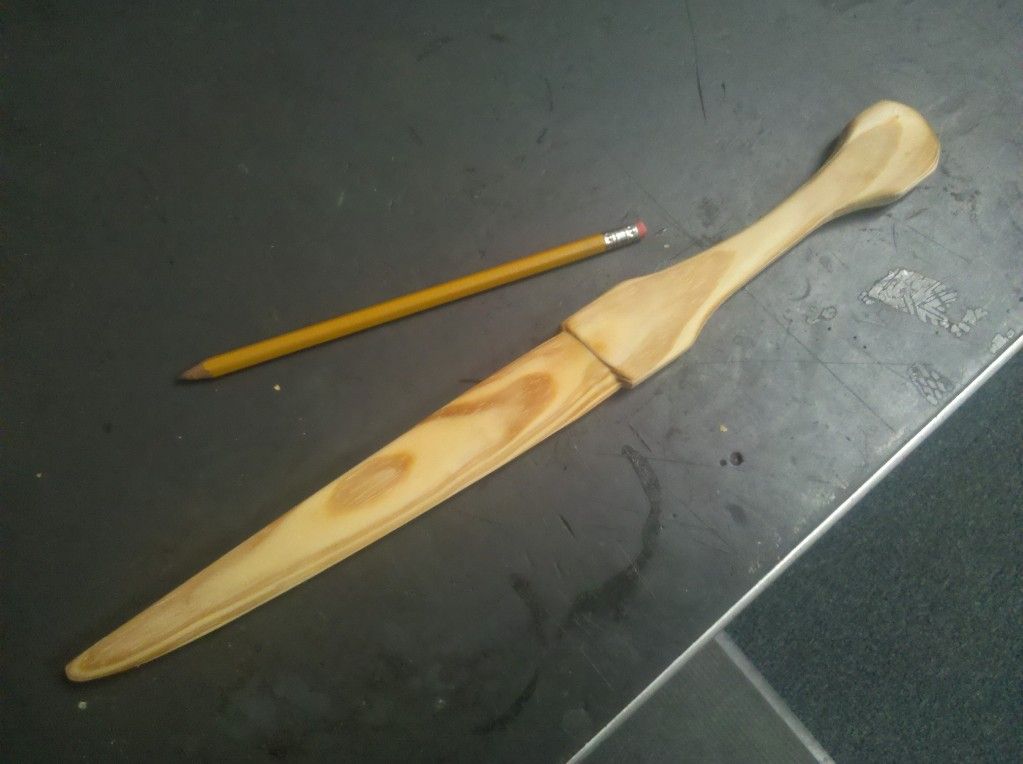
Once I felt comfortable that I had it shaped just the way I wanted (or the way my coping saw apparently wanted) I sanded it all down. I'd like to say that I took my time to do it right and started with a coarse sandpaper and then gradually moved to a fine grit, but in reality I just grabbed some scrap sandpaper and scrubbed vigorously until I had turned my scraps of sandpaper into shreds of sandpaper. At that point it was pretty smooth so I was happy.
I wanted to do something to it to finish it off and make it look really cool so I stared at it for a while and tried to imagine it with different accessories. I considered doing a cool design with my wood burner but I just couldn't figure out what to do so instead I ended up just going with a leather wrapped handle. I had a long strip of some sort of fake leather that I ended up using because it was already the perfect size.
At some point during all of my projects I end up cheating or using something in a way that it was not intended to be used. This is that moment. I didn't have any glue and I just wanted to finish it so I ended up using this ModPodge Puzzle Saver stuff that I have. It's basically glue so hopefully it will be fine, but it's not intended for this kind of use so it might come apart later and force me to find the appropriate type of glue. Either way I spread some of it around on the handle and the back of the strap as I wrapped it around.
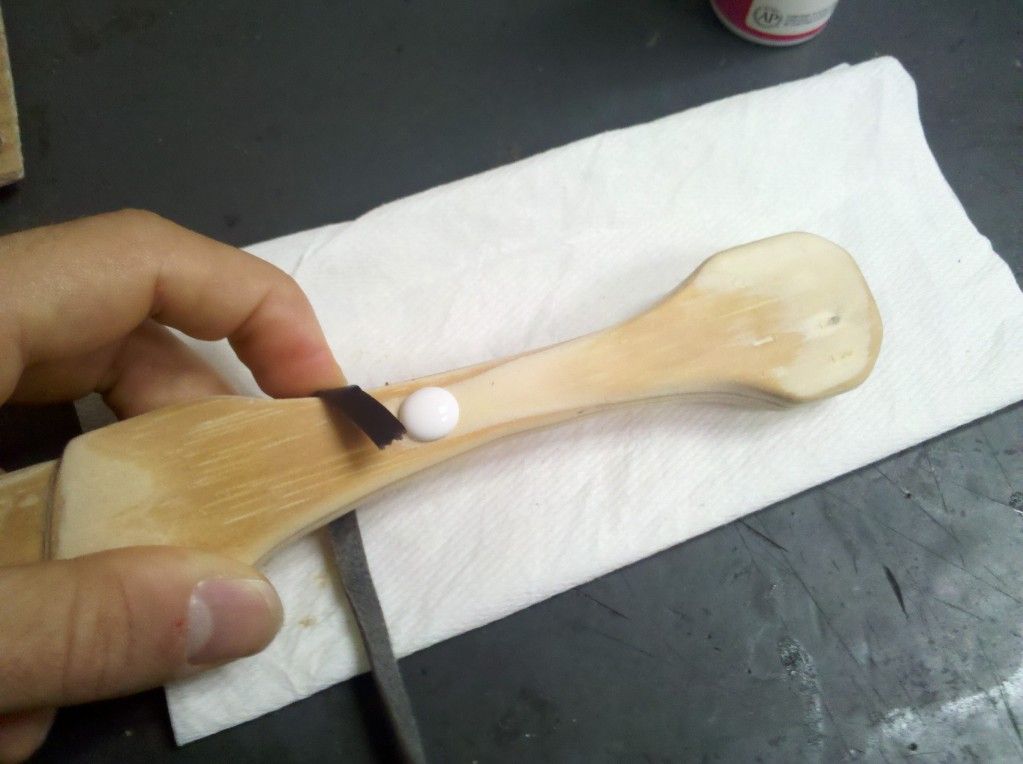
Once I had wrapped the strap around the handle I tucked the end under and coated it with more of the "glue".

Here are a couple shots of the final project.
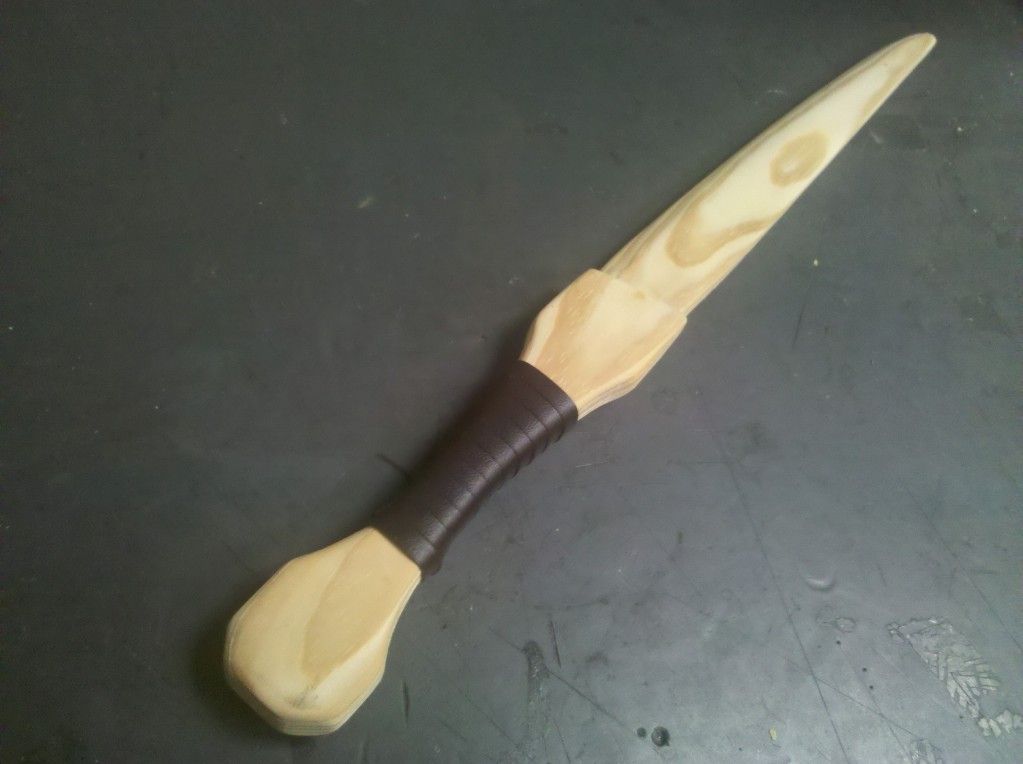
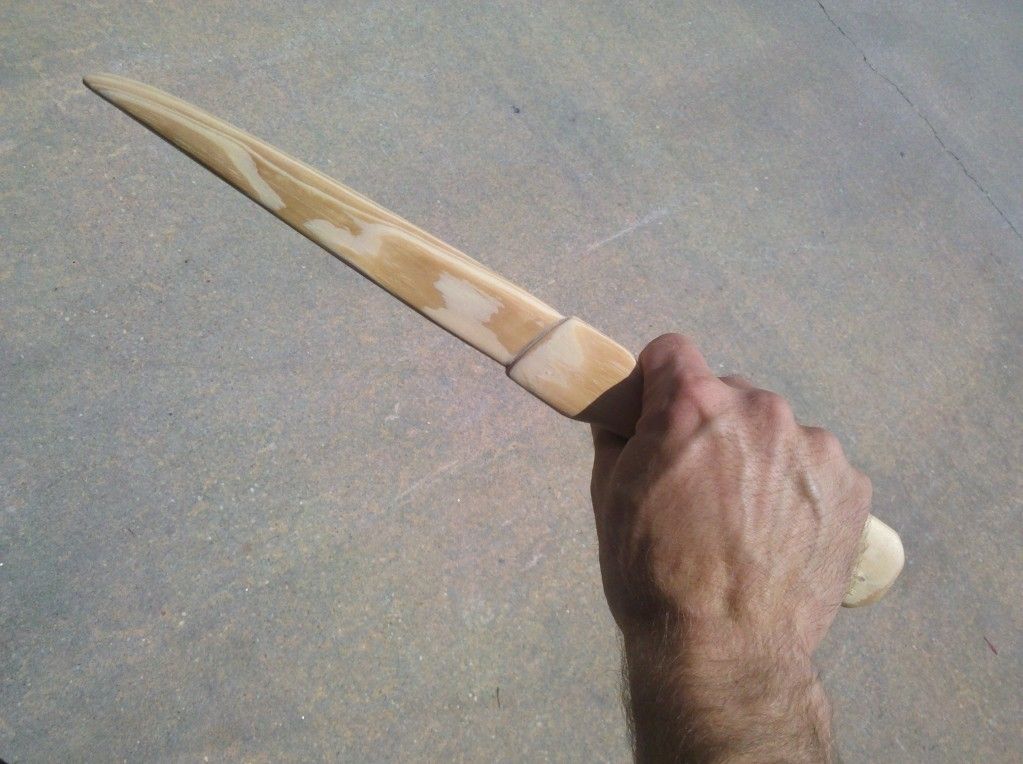

I'd like to make other styles too. Maybe I'll try to make the style I was originally going for. I'd also like to make some more wooden swords that are less toy and more prop. Right now I'm incredibly inspired by this sword by Blind Squirrel Props as well as this sword and this sword by Fevereon Props. Their work is way over my head and they use a lot of materials and tools that I have no idea how to use, but the way they put things together and the awesome props they make are really incredible. Maybe one day I'll achieve that skill level.
Subscribe to:
Posts (Atom)